
🗣 Want to view this article in a different language?
Automation
Who
Available for subscribers of: PropertyCare.com
Available to: Users with access to the dashboard with ability to create tasks.
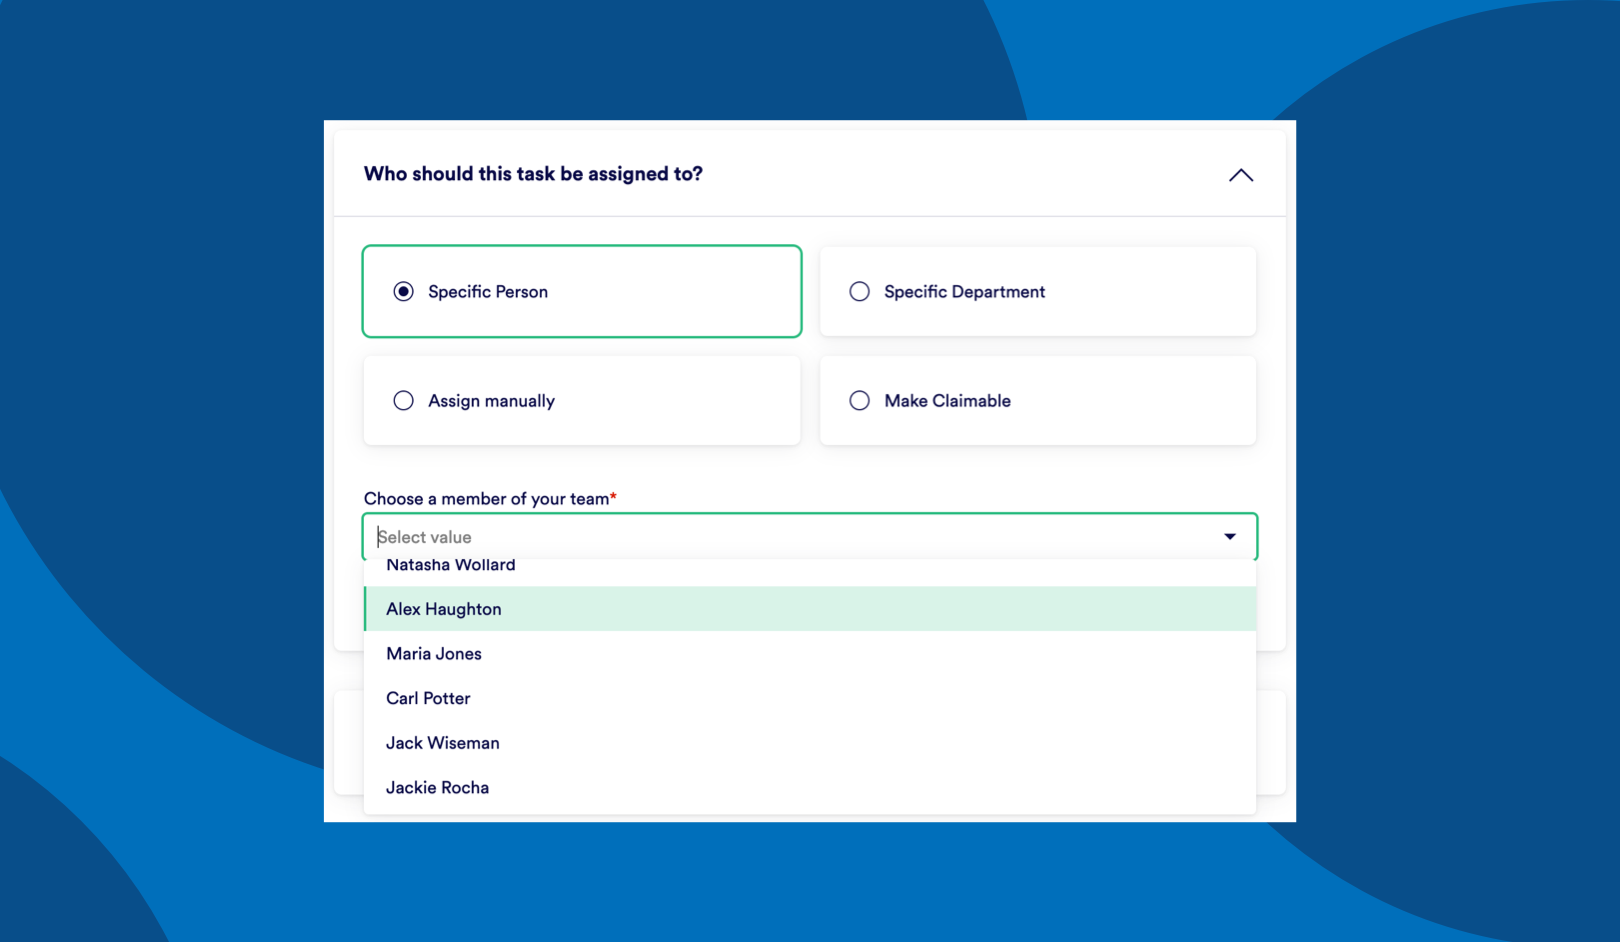
Who should this task be assigned to?
Depending on your processes you may want to auto-assign the task or generate them but have the task cards be assignable by your resource manager via the Staff Roster section of the Operations area of the main sidebar. Alternatively you can make the cards claimable by a specific group or department – lets look at all of these options in more detail.
Specific Person
As this sounds, selecting this option means you will choose a specific person on your team to assign this task to. Clicking in the dropdown zone will display all your members and you simply tap again to choose them.
By default a task assigned to a specific person will force the assignment of the task to the chosen person, so irrespective of whether the assignee has other tasks queued this task will be allocated to them (it can provide clashes but provides the security the task will definitely be assigned). If you would prefer the task allocation engine to consider your assignees availability (to prevent clashes) you can tick the option to ‘Only schedule the task if the assignee has availability’. In that instance any tasks that cannot be assigned due to clashes with the chosen assignees availability will generate but sit in the unassigned section of your Staff Roster ready for manual assignment.
A Department
Depending on the size of your company and operations you may find that allocating tasks that are linked to bookings are better to be spread across a team rather than allocated to an individual.
Not all members of your company are likely to be potential task assignees so you can create departments containing just the members you need (examples include departments containing just cleaners / housekeeping members, just maintenance staff, just inspectors etc).
Once your departments are set you can then opt to assign tasks to a department. Simply choose which one from the dropdown.
You may require multiple people on site per task in which case when assigning to a department you can choose the number of assignees. Bear in mind each assignee will get identical versions of the task card to complete and there is not (yet!) a shared way to tick off tasks on the same list (note this feature is on our roadmap but no date is available yet). So you will need to inform your team if multiple people are attending which of the items on the task card each person is responsible for. Once they have completed them they will also need to tick off the items the other assignee(s) did in order to complete their instance of the task card.
The method by which the tasks are assigned within that department has 2 options.
- Auto-assign to members of the chosen department. This means our system will pick an available member to assign it to.
- Allow members of the chosen department to claim the task. This means the task will be available to everyone in the department on the ‘Claim’ tab of the Tasks app. From there anyone can claim the task (thereby assigning it to themselves).
It’s worth remembering that your company Admin will have defined for each user in your company which properties they have access to. There may be some occurrences where you have eg 10 members of staff in your housekeeping team each with access to specific properties but there may not always be overlap. So obviously if a property has no-one in that department then task cards can not be auto-assigned and there will be no-one in that department to claim it. Assuming you have access to the property, you can see on the ‘Team’ tab of a chosen property page (from the side bar Properties menu) which team members have access. Alternatively you can go to the All Users page of the Users & Departments area of your Company Settings section to check each user individually.
A few further points to note when using the Department choice:
Auto Assigning Rules: In the Global Settings section there is an Auto Assigning Rules section, ensure you’ve read up on that in our Global Settings support guide to understand whether you want to use a round robin technique for allocating tasks or whether to stack up individuals before moving on.
Team Prioritzation: Also in the Global Settings support guide you should be familiar with your team prioritization as the order in which department tasks should be allocated is heavily dependent on this.
Forced Assignment: Similar to when assigning to a single Specific Person, by default we will force the assignment of the task to someone in your chosen department (assuming there is someone from your team in the chosen department attached to the properties of the task) this can provide clashes but provides the security the task will definitely be assigned. The allocation engine will cycle through the department team members (in the order you set in Team Prioritisation (see above)) to check availability, if no one is available it will simply allocate to the person set as priority one within that department. If you would prefer NOT to allocate if everyone is already scheduled you can tick the option to ‘Only schedule the task if the assignee has availability’. In that instance any tasks that cannot be assigned due to clashes with the assignees availability will generate but sit in the unassigned section of your Staff Roster ready for manual assignment.
Assign Manually
Depending on your assignment settings across all your tasks it’s probable that some tasks will need manual assignment. For this reason the Staff Roster and Property Overview sections of the main Operations side bar section should be monitored on a day-to-day basis.
You may decide that you want a team member to act as a Housekeeping Manager or Maintenance Resource Manager to manually assign each task so you can be 100% certain the right people are assigned the right tasks (or simply to double check the allocation engine is doing its job correctly). You can choose Assign Manually here to skip the assignment element and instead ensure the task card(s) end up in the Staff Roster. Full details about how tasks are manually assigned can be found on the Staff Roster support page.
If choosing to assign manually, you may have different managers per department so you can choose to group the tasks by a department to allow access to just those people. If your manager has access to all departments, the tasks (if nominated to a department) will show grouped on the Staff Roster page (where the manual assigning happens) which can make it easier to use on a day-to-day basis.

Make Claimable
Some companies prefer to let their employees schedule their own time. This avoids needing to allocate tasks and instead puts the onus on the employees to claim from a pool of tasks. This understandably comes with its own managerial problems but none-the-less is an option some companies prefer. Selecting ‘Make Claimable’ allows for your tasks to be seen (on the Visibility date) in the Tasks App. An employee simply selects the option to claim the task which effectively allocates it to themselves.
Claimable tasks also show in the Staff Roster section so can be manually allocated to over-ride the claimable section by an Admin if needed.
The selection of who to assign the task to is the final step in your automation setup. Selecting ‘Save’ from the left side section
will show you a summary pre-saving it of how many tasks will be generated. Once you’re happy you can choose to save and/or generate the task cards to progress.
If the number of task cards about to generate feels wrong, cancel the save modal and double check you’re settings. If you’ve checked and it’s still not right, get in touch with your account manager or our support team and one of our team can assist.

💬 If you have any questions, please reach out to your account manager or use our contact form here.